
The more I read about how active learning techniques improve student learning, the more I am inclined to try out such techniques in my own teaching and training.
I attended the third week of Titus Brown’s “NGS Analysis Workshop”. This third week entailed, as one of the participants put it, ‘the bleeding edge of bioinformatics analysis taught by Software Carpentry instructors’ and was a unique opportunity to both learn different analysis techniques, try out new instruction material, as well as experience different instructors and their way of teaching. On top of that the group was just fantastic to hang out with, and we played a lot of volleyball.
I demonstrated some of my teaching and was asked by one of the students for references for the different active learning approaches I used. Rather then just emailing her, I decided to put these in this blog post.
The motivation of turning to active learning techniques is nicely summarised in a post on the ‘communications of the ACM’ blog entitled “Be It Resolved: Teaching Statements Must Embrace Active Learning and Eschew Lecture”. I highly recommended reading it and checking out the references mentioned. I am by no means an expert in the area, and simply am learning by doing. I have no ways to measure whether the techniques I use are beneficial, but student responses strongly encourage me to keep applying them. My teaching is also very much influenced by my being a Software Carpentry instructor.
The following describes what I do in the de novo genome assembly module of the ‘High Throughput Sequencing technologies and bioinformatics analysis’ course I organise (link to materials). I used part of that module for the NGS Analysis Workshop (link).
Live coding rather than recipes or copy-paste
The course is mostly hands-on, with students executing command-line based unix programs and scripts, and using GUI-based programs to inspect the results. Until last year, I would provide the students with written instructions (examples here) which they would follow at their own pace, with occasional discussions with the whole class. I always made sure there were places in the material where the students had to figure out some details of the commands themselves, rather than providing cookbook instructions. One alternative I experienced during the NGS Analysis Workshop was cookbook, copy-paste instructions (with explanations) that the instructor would execute live together with the students. The Instructor then explained the details of the command while executing it. A third alternative, as done during Software Carpentry workshops, is to not give instructions at all, but do everything live coding (and provide the written instructions afterwards). This was the strategy I tried during my module.

A class of active learners. Source: https://twitter.com/steeljawpanda/status/636233683444350976
I thought live coding everything worked quite well. I explained each part of the command while typing it, which gives a nice level of detail, with the added benefit of slowing the pace of instruction. The obvious drawback is students missing some detail and lagging behind once the instructor hits ‘enter’ and the code executes. Solutions are having one helper add the commands to an online document (such as Etherpad) that refreshes automatically for the students, scrolling back in the terminal window to show the command, or regularly running the unix history command for the students.
Pen and paper exercises
Titus Brown developed a really useful off-computer ‘assembly exercise’ that I use each time in my teaching. Students receive printed sheets with short 14 character snippets (‘reads’) randomly drawn from a real English text, optionally with small single-character mistakes (‘sequencing errors’) that in total make up 5x coverage. In groups of 4 to 5 students, students try to reconstruct the source text. I provide scissors and some students do indeed cut out all reads and align them up in the desk. I described the exercise in more detail (with photo’s) in a previous blog post. Again, students are very active and really make a collaborative effort, and seem to be enjoying it. It also enables a discussion of many important aspects of the challenges of genome assembly.
Exploration using the Jupyter notebook
I have put together a Jupyter notebook with python code (developed by Ben Langmead) which allows the students to explore small De Bruin graphs, visualising the nodes and the effect of choosing different kmer sizes on the graph’s structure. Details again in the above-linked blog post. The keyword here is playing around with code and exploring. ‘Pair programming’, where only one student is allowed to use the keyboard, and the other observing and commenting, can optionally be used here. An example of the notebook with some graphs can be found here.
Collaborative exploration
I use the velvet assembly program for teaching because it is a simple to use program and runs very fast on bacterial genomes. One goal is to teach the effect of choosing different kmer sizes for De Bruin Graph assembly. Here, the students collaboratively explore this parameter space by each picking a kmer size, ‘reserving’ that size on a editable google spreadsheet, and logging the resulting assembly metrics. The spreadsheet has a graph showing the contig N50 for the different kmers, the graph updates in real time and is shown on the presenter screen in the classroom (here is a screenshot from one of the student’s blogs). See the final plot here.
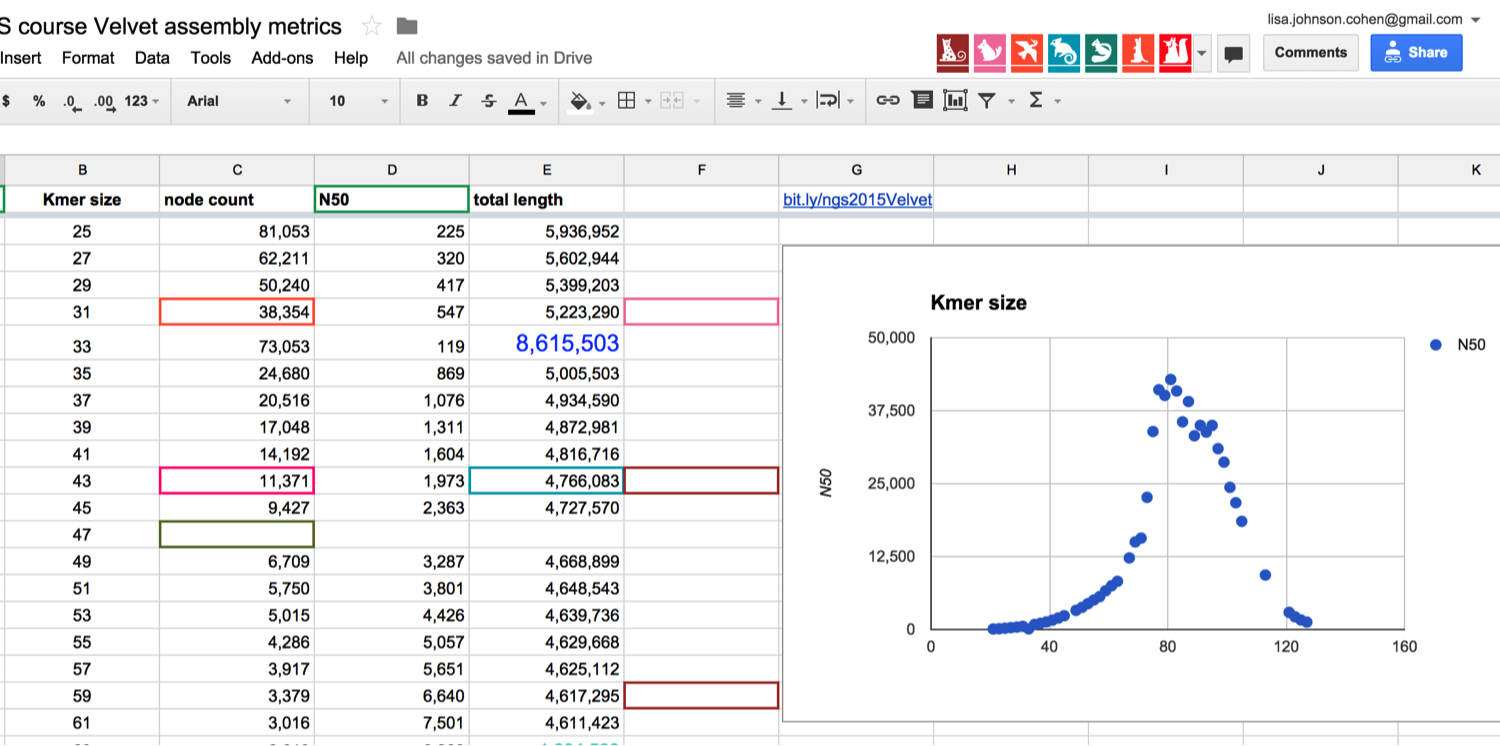
Adding assembly metrics to the google spreadsheet. Source: https://monsterbashseq.wordpress.com/2015/08/25/genome-assembly-week-3-ngs-2015/
I get very positive responses from the students, they really appreciate seeing the graph grow. We then discuss the results and pick the ‘optimal’ kmer size for the remainder of the assemblies.
I have to credit Nick Loman for the idea of using a google spreadsheet for this part.
Peer instruction through quizzes
Eric Mazur is credited for the technique of ‘ConcepTests’. The basic premise is that “Nothing clarifies ideas better than explaining them to others.” The variation of this that I use goes like this:
- I pose a multiple choice question
- students discuss the question in pairs
- each pair gets to vote through an online system, I use a simple google form for this
- I show the tally of the votes, using the ‘summary’ function of the google form (which shows a pie chart)
- student pairs discuss the tally and consider whether they want to change their opinion
- students vote again and the tally is shown again
- the answers are discussed by me

The question, google form and responses
At the NGS analysis workshop I learned that I should make a few modifications: before discussing the question, each student first forms their own opinion and their explanation of it, and each student votes for themselves, not as a pair (pairs can disagree).
I have used this technique three times now, twice in a Software Carpentry workshop, and the last time at the NGS workshop. Each time there is a great buzzing among the student, actively discussing the questions. They really appreciate the showing of the votes summary and change to vote twice.
To keep things simple, I use a single google spreadsheet that has unnamed questions (see picture) and delete all responses in-between votes. This allows me to pick from a set of multiple choice questions without having to make a form for each of them. I simply make slides for all questions and decide on the spot which one to use.
The main challenge with multiple choice questions is that developing good ones takes time: there have to be plausible wrong answers.
Concluding thoughts
To me, it feels like my teaching has become more interesting, more active, more interactive, and thus hopefully better. I am going to make an effort to turn more of the teaching I do (e.g., the occasional lecture for someones else’s course) into active learning experiences. This takes time, most likely more time than the traditional way (e.g, lecturing). But it is definitely worth it. And, to quote a quote from this Nature News piece: “At this point it is unethical to teach any other way”.
With thanks to the students of the NGS Analysis Workshop for feedback and discussions, and Lisa Cohen for the screenshot of the google spreadsheet.

Lex – Thank you so much for putting this together. I have been working with the Summer Institutes and HHMI to develop active teaching tools in my ecology classes, it is a lot harder to think of ways to incorporate these techniques when it comes to coding. You demonstrated some really useful techniques that I can use with my introductory bioinformatics classes as well.
You’re welcome! Good luck with implementing active learning, it is a lot of work but definitely worth it.